Terraform Skeleton Part 4: Backend Role
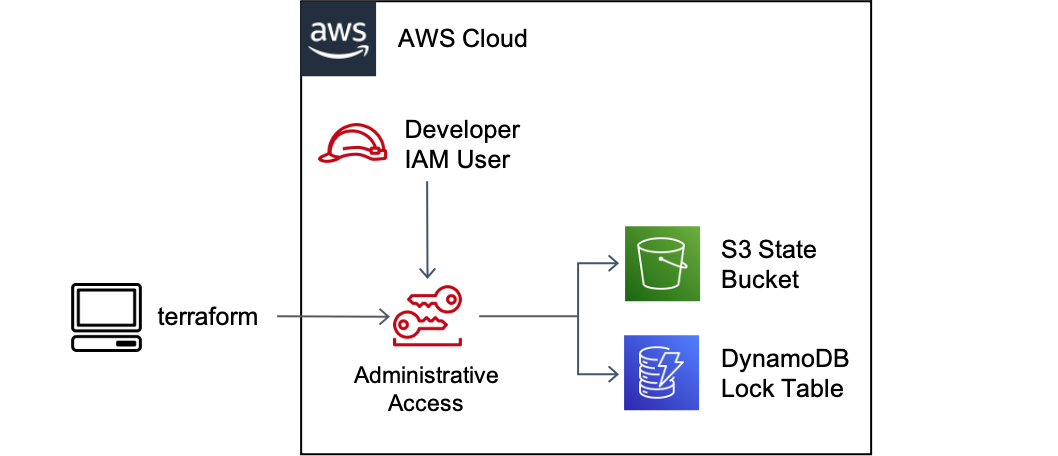
The previous entry enhanced the terraform skeleton with remote state storage using AWS S3 and DynamoDB. Access to the state was granted based on whatever AWS credentials were configured in the shell at the time terraform was executed.
Terraform state is a highly sensitive resource. It is likely to contain lots of sensitive information including passwords and access tokens. Additionally, recovering from a lost state file means either recreating all the infrastructure that was in it, or spending some quality time running terraform import commands for resources that support it, and hand modifying state files for those that do not.
On projects I’ve supported, developers have had near-administrative level permissions on their cloud accounts. Typically, these are the credentials they will use when running terraform, which also requires near-administrative level permissions to manage the wide variety of cloud resources a project is likely to need. Unless instructed otherwise, terraform will use those administrative credentials for accessing the state, and that opens up the potential for disaster (e.g., a developer mistakenly deleting a state bucket).
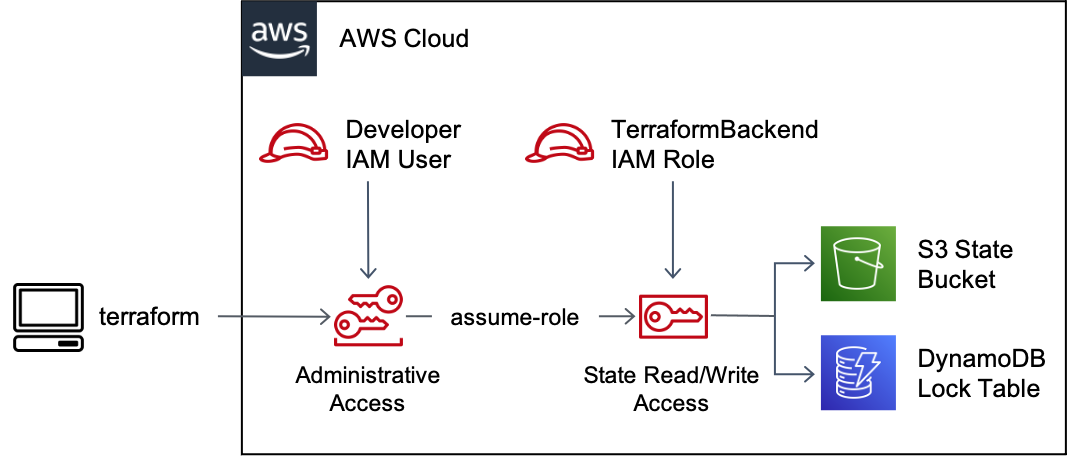
In this post, we’ll create a dedicated IAM role for backend access so that every developer on our team working with terraform will access state with the same permissions, and those permissions are scoped to just what is needed to read and write state.
Using a dedicated backend role for state access will help avoid “works on my machine problems” and allow us, in future entries, to lock down access to terraform state due to its sensitive nature.
Goals
- The skeleton uses a dedicated IAM role for accessing terraform state such that everyone on the team accesses state with the same least-privilege permissions
- The IAM role and its permissions are controlled using infrastructure-as-code
If you prefer to jump to the end, the code implementing the final result is available on GitHub.
Setup
You will need:
- An AWS account to serve as your terraform “admin” account, holding the state resources
- The AWS CLI installed on your workstation
- Credentials for that account configured in the terminal for running
awsCLI commands
The Administrative Account
Before we create our backend IAM role, it is worth discussing cloud account organization. Chances are strong that you’re going to have more than one account.1 Typically, one per application environment is recommended:

With multiple accounts, the question of where we put our terraform state arises. We could put the state for each tier-environment in its corresponding account (e.g., app-dev state in the app-dev account) but I don’t like doing that for several reasons:
- It assumes our tiers line up one-to-one with accounts, which may not always be true
- I prefer to restrict administrative access to terraform state to a subset of those who have access to environment accounts.
Instead, I prefer to use a separate admin account to hold all the state, an approach recommended in the documentation for the S3 backend:
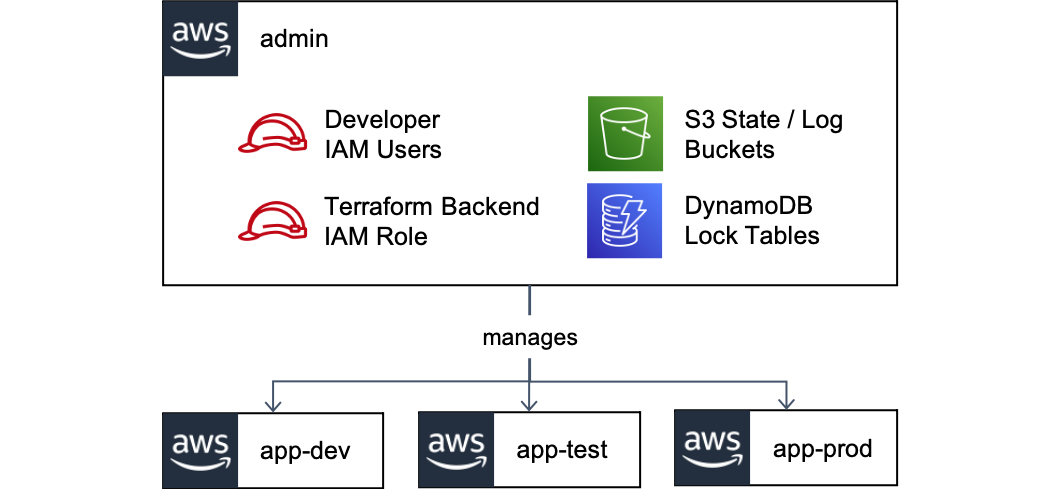
With this approach, our admin account contains:
- S3 bucket(s) for terraform state
- S3 bucket(s) for state logs2
- DynamoDB table(s) for terraform locks
- IAM roles for accessing the above
The first three were created in the previous entry. Now, we’ll create our backend role.
The Backend Role
We have a bit of a chicken and egg problem with the backend role. We want to control all infrastructure as code, the backend role included, but we can’t use the backend role for terraform until it is created. A similar problem presents itself if you want to self-manage the creation of your S3 state bucket and DynamoDB lock table.
While it’s possible to use terraform to create these resources by having a stack that either stores state locally initially and/or uses user credentials instead of the backend role, I tend not to do that. I prefer to separate the infrastructure needed for terraform to run from the infrastructure terraform creates, and manage the former using CloudFormation. A simple CloudFormation stack is more than capable of managing the few resources needed to bootstrap an AWS account to serve as our admin account and means we offload the state management of that bootstrap infrastructure to AWS’s CloudFormation tool.
Preparation
Before adding CloudFormation templates to our infra repository, I like to add a pre-commit hook that validates those templates. It’s easy to make syntax errors with CloudFormation; using a validation hook helps to shorten the feedback loop. I do the following:
- Store bootstrap CloudFormation templates under
init/in the infra repo - Use a file extension of
.cf.ymlto differentiate CloudFormation templates from regular YAML files - Use the cfn-python-lint pre-commit hook to validate the CloudFormation templates
Let’s add the hook to our .pre-commit-config.yaml:
diff --git a/.pre-commit-config.yaml b/.pre-commit-config.yaml
index fa080cf..27217e9 100644
--- a/.pre-commit-config.yaml
+++ b/.pre-commit-config.yaml
@@ -24,3 +25,9 @@ repos:
   rev: v0.1.10
   hooks:
     - id: terragrunt-hclfmt
+
+- repo: https://github.com/aws-cloudformation/cfn-python-lint
+  rev: v0.44.5
+  hooks:
+  -   id: cfn-python-lint
+      files: init/.*\.cf\.(yml|yaml)$
This configures the hook to scan all templates under the init/ directory. We also need to tell our existing check-yaml hook to ignore the CloudFormation templates because it will throw errors on CloudFormation’s interpolation syntax. We can do that with:
diff --git a/.pre-commit-config.yaml b/.pre-commit-config.yaml
index fa080cf..27217e9 100644
--- a/.pre-commit-config.yaml
+++ b/.pre-commit-config.yaml
@@ -8,6 +8,7 @@ repos:
       args: [ --markdown-linebreak-ext=* ]
     - id: check-yaml
       args: [ --allow-multiple-documents ]
+      exclude: .*\.cf\.(yml|yaml)$
     - id: check-json
     - id: check-merge-conflict
     - id: detect-aws-credentials
Finally, run pre-commit install and pre-commit run -a to make sure all hooks are currently passing.
Admin Account CloudFormation Template
Create a new CloudFormation template at init/admin/init-admin-account.cf.yml. You’ll need parameters for the admin account ID, state bucket, log bucket, and lock table names. I like to use CloudFormation’s metadata property to group the parameters sensibly, should you use the AWS Management Console to deploy the stack:
---
AWSTemplateFormatVersion: '2010-09-09'
Description: Initialize terraform admin account
Metadata:
  AWS::CloudFormation::Interface:
    ParameterGroups:
      - Label:
          default: Admin Account Config
        Parameters:
          - AdminAccountId
      - Label:
          default: Terraform State Resources
        Parameters:
          - StateBucketName
          - StateLogBucketName
          - LockTableName
Parameters:
  AdminAccountId:
    Type: String
    Description: Account ID of the admin account to contain the state
  StateBucketName:
    Type: String
    Description: Name of the S3 bucket for terraform state
  StateLogBucketName:
    Type: String
    Description: Name of the S3 bucket for terraform state logs
  LockTableName:
    Type: String
    Description: Name of the terraform DynamoDB lock table
Next, add a CloudFormation rule to restrict deployment of the stack to only the specified account. This is to help prevent someone from deploying the stack to the wrong account.
Rules:
  EnsureDeployingToCorrectAccount:
    Assertions:
      - Assert:
        'Fn::Equals':
          - !Ref AWS::AccountId
          - !Ref AdminAccountId
        AssertDescription: 'Stack can only be deployed into the specified AdminAccountId'
Next, add a resource to create an IAM managed policy for read/write state access:
Resources:
  TerraformStateReadWritePolicy:
    Type: 'AWS::IAM::ManagedPolicy'
    Properties:
      ManagedPolicyName: TerraformStateReadWrite
      Path: /terraform/
      Description: Read/write access to terraform state
      PolicyDocument:
        Version: 2012-10-17
        # Permissions are based on:
        # https://www.terraform.io/docs/backends/types/s3.html#example-configuration
        # https://github.com/gruntwork-io/terragrunt/issues/919
        Statement:
          - Sid: AllowStateBucketList
            Effect: Allow
            Action:
              - 's3:ListBucket'
              - 's3:GetBucketVersioning'
            Resource: !Sub "arn:aws:s3:::${StateBucketName}"
          - Sid: AllowStateReadWrite
            Effect: Allow
            Action:
              - 's3:GetObject'
              - 's3:PutObject'
            Resource: !Sub "arn:aws:s3:::${StateBucketName}/*"
          - Sid: AllowStateLockReadWrite
            Effect: Allow
            Action:
              - 'dynamodb:DescribeTable'
              - 'dynamodb:GetItem'
              - 'dynamodb:PutItem'
              - 'dynamodb:DeleteItem'
            Resource: !Sub "arn:aws:dynamodb:${AWS::Region}:${AWS::AccountId}:table/${LockTableName}"
          - Sid: AllowStateBucketCreation
            Effect: Allow
            Action:
              - 's3:GetBucketAcl'
              - 's3:GetBucketLogging'
              - 's3:CreateBucket'
              - 's3:PutBucketPublicAccessBlock'
              - 's3:PutBucketTagging'
              - 's3:PutBucketPolicy'
              - 's3:PutBucketVersioning'
              - 's3:PutEncryptionConfiguration'
              - 's3:PutBucketAcl'
              - 's3:PutBucketLogging'
            Resource:
              - !Sub "arn:aws:s3:::${StateBucketName}"
              - !Sub "arn:aws:s3:::${StateLogBucketName}"
          - Sid: AllowLockTableCreation
            Effect: Allow
            Action:
              - 'dynamodb:CreateTable'
            Resource: !Sub "arn:aws:dynamodb:${AWS::Region}:${AWS::AccountId}:table/${LockTableName}"
This policy grants everything needed by the S3 backend to manage the state. It’s worth noting that terragrunt requires additional permissions beyond what terraform specifies.
In particular, this policy does not grant delete access to the terraform state. As already discussed, losing your state file can create a tremendous amount of pain. Using a versioned S3 bucket helps, but you can still get yourself into trouble if you delete the bucket itself. Since the backend role does not require delete access, it does not get it.
Furthermore, the policy is restricted to creating only the specified bucket and lock table names. Given that terragrunt will auto-create a bucket and lock table if they do not exist, this restriction helps avoid unintended auto-creations due to developer errors.
Next, we’ll create the backend role, TerraformBackend, and attach the policy to it:
  TerraformBackendRole:
    Type: 'AWS::IAM::Role'
    Properties:
      AssumeRolePolicyDocument:
        Version: 2012-10-17
        Statement:
          - Effect: Allow
            Principal:
              AWS: !Ref AWS::AccountId
            Action:
              - 'sts:AssumeRole'
            Condition:
              StringEquals:
                aws:PrincipalType: User
              StringLike:
                'aws:PrincipalTag/Terraformer': '*'
      RoleName: TerraformBackend
      Path: /terraform/
      ManagedPolicyArns:
        - !Ref TerraformStateReadWritePolicy
In the AssumeRolePolicyDocument, I’m specifying who can assume the backend role. There are several ways to go about this, depending on what type of principals are doing the assuming. You could use IAM groups if the principals are IAM users, or SAML context keys if dealing with federated users. I’m going to use an attribute-based access control (ABAC) approach that will grant access if the principal has a tag of Terraformer. I’m also going to restrict access down to IAM users since that’s what I’m working with. The same approach should work for other principal types as well.
Finally, let’s add a Makefile to script deployment of our CloudFormation stack:
ADMIN_INIT_STACK_NAME := tf-admin-init
STATE_BUCKET_NAME := terraform-skeleton-state
STATE_LOG_BUCKET_NAME := terraform-skeleton-state-logs
LOCK_TABLE_NAME := terraform-skeleton-state-locks

# Use a known profile to ensure account ID is correct
ADMIN_ACCOUNT_ID := $(shell \
	aws --profile tf-admin-account sts get-caller-identity | jq -r .Account \
)

BACKEND_ROLE_PATH := terraform/TerraformBackend
BACKEND_ROLE_ARN := arn:aws:iam::${ADMIN_ACCOUNT_ID}:role/${BACKEND_ROLE_PATH}

DEPLOYMENT_DIRS := $(shell find deployments -name terragrunt.hcl \
	-not -path */.terragrunt-cache/* -exec dirname {} \; \
)

.PHONY: init-admin
init-admin:
	aws cloudformation deploy \
		--template-file init/admin/init-admin-account.cf.yml \
		--stack-name ${ADMIN_INIT_STACK_NAME} \
		--capabilities CAPABILITY_NAMED_IAM \
		--parameter-overrides \
			AdminAccountId=${ADMIN_ACCOUNT_ID} \
			StateBucketName=${STATE_BUCKET_NAME} \
			StateLogBucketName=${STATE_LOG_BUCKET_NAME} \
			LockTableName=${LOCK_TABLE_NAME}
	aws cloudformation update-termination-protection \
		--stack-name ${ADMIN_INIT_STACK_NAME} \
		--enable-termination-protection

.PHONY: test-backend-assume
test-backend-assume:
	aws sts assume-role \
		--role-arn ${BACKEND_ROLE_ARN} \
		--role-session-name $(shell whoami)

.PHONY: init-all
init-all:
	for d in ${DEPLOYMENT_DIRS}; do \
		pushd $$d; \
		terragrunt init; \
		popd; \
	done
The Makefile:
- Uses the aws cloudformation deploy command, which will both create the stack if it does not exist and update it if it does.
- Turns on termination protection as a basic safety measure on our stack.
- Provides a test command to verify our ability to assume the backend role.
- Provides an init-all command, which will be needed when we change out deployments to use the new backend role.
It’s time to deploy the backend role and use it. To do so:
- Open a terminal and ensure you have AWS credentials to deploy the stack loaded.
- Run
make init-adminto deploy the CloudFormation stack. - Add the
Terraformertag to the appropriate IAM users.3 - Ensure you can assume the new backend role with
make test-backend-assume.
Next, we need to tell terraform to use the backend role for remote state access. Do so by updating the remote_state block inside root.hcl to include the role_arn property:
diff --git a/deployments/root.hcl b/deployments/root.hcl
index eed54e8..33091af 100644
--- a/deployments/root.hcl
+++ b/deployments/root.hcl
@@ -46,9 +46,10 @@ remote_state {
     if_exists = "overwrite"
   }
   config = {
     bucket   = "terraform-skeleton-state"
     region   = "us-east-1"
     encrypt  = true
+    role_arn = "arn:aws:iam::YOUR_ADMIN_ACCOUNT_ID:role/terraform/TerraformBackend"
To finish switching the deployments over to the new backend configuration we must re-initialize them. Do so with make init-all.
Finally, run terragrunt apply-all from the repository root. Everything should work.
What’s Next?
Although this was a fair amount of work, it is important. We now have a single role that gets used for all state manipulation by terraform. That role can be assumed by any of the developers working with terraform and, in future entries, can also be assumed by CI/CD jobs such that all terraform operations use a consistent set of permissions.
We also began creating infrastructure required to run terraform itself outside of terraform, relying on CloudFormation instead. Upcoming entries will continue this trend, which, along with the backend role we’ve created, will allow us to lock down access to our state bucket.
Footnotes
-
I’m using the AWS term account here because out of the cloud providers, my teams use AWS the most heavily. Equivalents include Google Cloud Platform (GCP) projects and Microsoft Azure resource groups. ↩
-
Another option is to place the logs bucket in a dedicated information security account. For more on this, I recommend videos from re:invent covering multi-account architectures. Here’s one from 2019. ↩
-
Although I don’t talk about it here, you would want to have tight control over who can add the Terraformer tag. Similarly, you need tight control over the ability to attach terraform IAM policies. The control mechanisms to use depend on how your organization manages user access to cloud accounts and is beyond the scope of this post. ↩